BLOG
Get started with Pixieset Studio Manager: Client management app for photographers

If you ever feel like the business side of photography is taking over the creative side, you’re not alone. Scheduling bookings, invoicing, contracts, emailing, and keeping track of each client can quickly pile up and leave little room for what you actually love doing — photographing. That’s where a client management app like Pixieset Studio Manager comes in. It can help you stay organized, streamline the admin work, and easily run your business even when you’re away from your computer. Also, you can get started with Studio Manager for free.
In this article, you’ll learn how Studio Manager works, how to set it up quickly and start using it for your photography business.
Jump to:
- Set up your foundation
- Choose how you get paid
- Create invoices and contracts
- Set up your booking calendar
- Manage client emails
- Organize projects and document templates
- Download the mobile app
What’s a client management app and why photographers need one
A client management app, or a CRM, helps you simplify and organize the admin side of your business. It stores all your client details, documents, emails, and bookings in one central place — making it easier to stay on top of things. Photographers use CRMs to save time and optimize daily tasks, without juggling five different software. By using a client management app you also deliver a smoother client experience and look more professional each step of the way.

Pixieset Studio Manager — the client management app for photographers
Pixieset Studio Manager is designed to help photographers run the day-to-day side of their business with less stress. Whether you're just starting out or looking to streamline your process, Studio Manager can help bring together all the essential tools you need. You can use it to:
- Send invoices and get paid
- Book and schedule sessions
- Share contracts, quotes, and questionnaires
- Email clients and organize your communication
- Track projects from start to finish
- Manage your contacts list
You can access everything from your desktop, or manage things on the go with the Studio Manager mobile app.
How to set up your client management app (a step by step guide for Pixieset Studio Manager)
Step 1: Set up your account
Before you start taking bookings or sending documents, let’s set the basics so everything your clients see feels on-brand and consistent all across.
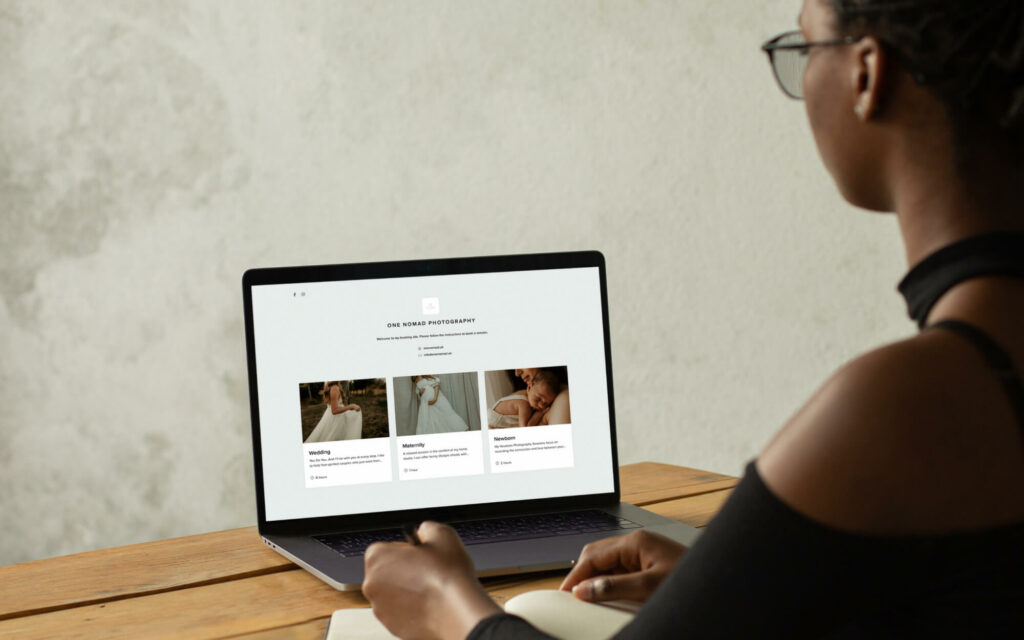
1. Create an account If you’re new to Pixieset, sign up for a free account at pixieset.com. Just enter your email, no credit card is required. If you already use Pixieset for galleries or your website, just click on Studio Manager in your dashboard.
2. Add your branding Set up how your business will be shown to clients. First, go to Settings > Branding. Upload your logo, a few cover images, pick a color and font theme. These will all be applied to your digital documents and your booking pages. Learn how to customize your branding for Studio Manager.
3. Review your profile details Go to Profile and review your business details. If you need to update any information, click “Edit business profile”. Here you can review and add your business name, contact email, business address, links to your website and social profiles, etc. These are used on your booking site, your galleries listing site, etc.
4. Add or import your contacts If you use Pixieset for galleries, you will notice that many of your clients are already synced into your contacts list, since Client Gallery is connected to Studio Manager. If you’re new to Pixieset, you can add new contacts manually, or import them as a CSV file. To do that, go to Contacts > New Contact, or click on Actions > Import Contacts at the top of your dashboard. You can label contacts as "clients," "leads," or "other" to keep things organized. Learn how to add new contacts to Studio Manager or import CSV files.

Step 2: Choose how to get paid
An important step when setting up your Studio Manager account, is choosing how you want to get paid for your photography services. With Pixieset you have several methods for your and your clients’ convenience. We highly recommend opting for online payments, as they are fast, secure, and have automatic reminders incorporated, which means you don’t have to chase clients for payments or keep sending “just following up” emails.
- Pixieset Payments (available in the US and Canada) — manage everything related to payments in one place, from invoices to payouts, disputes, and refunds. Offer clients multiple, flexible ways to pay: credit cards, digital wallets (Apple Pay, Google Pay, Link), buy-now-pay-later options (Affirm, Klarna) and more. You can also collect in-person payments right on your phone with Tap to Pay and the Studio Manager mobile app. Learn how to activate Pixieset Payments in Studio Manager.
- Stripe — connect your Stripe account to accept online payments by card and digital wallet.
- PayPal — connect your personal or business account to let clients pay through PayPal. Learn how to set up PayPal payments in Studio Manager.
- Manual payments — if you prefer to get paid in cash, checks, or e-transfers, you can log those payments in Studio Manager to keep track of all your revenue. When sending an invoice, simply include payment instructions for your client in the notes section. Learn how to set up manual payments in Studio Manager.
Go to Settings > Payments and follow the guided steps for each method.
Helpful resources:
- Pixieset Payments for photographers (US and Canada)
- Tap to Pay: collect in-person payments on your phone
- Download the Studio Manager mobile app
- 6 ways to get paid as a photographer through Pixieset

Step 3: Create essential documents
1. Create an invoice
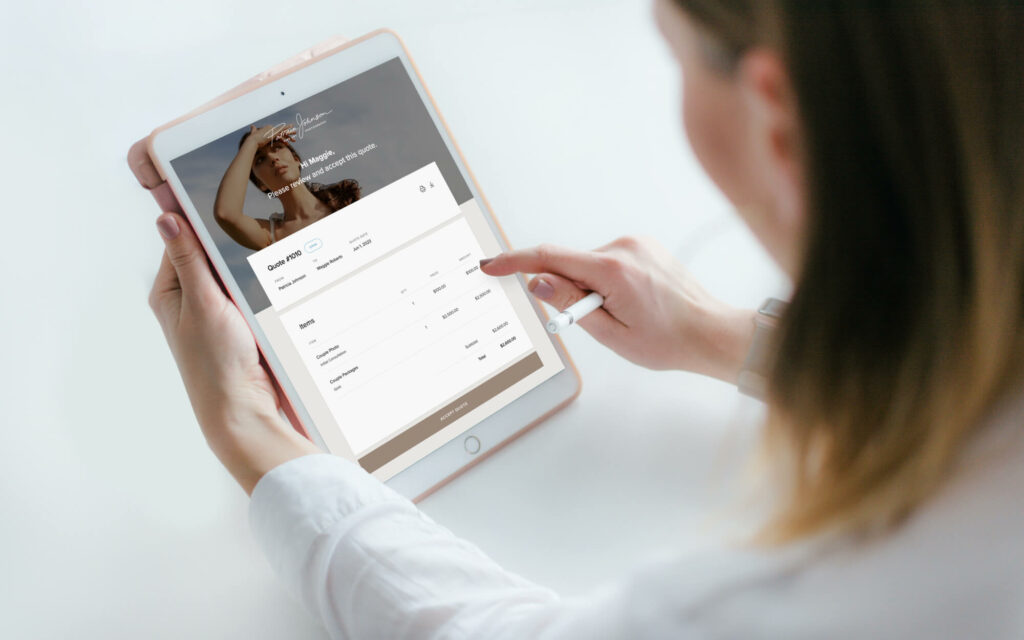
Having an invoice communicates to your client that you’re legit, you run a serious business, and want to get paid in an official and transparent way. It makes your pricing clear, and helps keep a record of all transactions for bookkeeping. With Pixieset invoicing is easy and elegant. Here’s an example of an invoice created in Pixieset. It’s branded, professional, can be viewed from any device, and easily paid online. To create your first invoice go to Payments > Invoices, click New Invoice and follow the steps.
When creating an invoice, you can:
- include a discount
- add tax information
- add a payment schedule to allow clients to pay in installments
- pick the payment methods available to the client
- add optional tipping
- turn on payment reminders so clients get automatic email follow-ups if they forget to pay
- personalize the featured photo
- save your invoice as a template
Before sending over your invoice to a client, you can easily preview how it looks. Once ready click Send Invoice. You can personalize your email message, and schedule it so it gets delivered at a convenient time for your client. You can also choose to share the invoice manually by selecting the ‘Send via link’ option. Once the invoice is paid, you’ll get a notification.
Learn how to create invoices in Pixieset. Also check out our article on 6 must-have things in your invoice.
2. Create a contract
Contracts protect your time and business from unforeseen situations, miscommunication, and challenging clients. A contract states clearly what will be delivered, what are the timeframes, what each party is responsible for, and what are the consequences if terms are broken. It helps set accurate expectations, build trustworthy relationships, and speeds up booking decisions.
Similarly to invoices, contracts in Pixieset are branded, elegant, easy to access and can be signed from any device. Here’s a contract example. To create your first contract go to Documents > Contracts, click New Contract and follow the steps. You can create your own contract from scratch, copy and paste one you’ve used before, or choose from 3 built-in photography contract samples to save time.
When creating a contract, you can:
- rename the contract
- add/remove signers, including yourself, as well as add a second signer
- add, delete and format titles and paragraphs as needed
- add custom fields for clients to fill in
- use variables like client name or session date that will be auto-filled from the client’s profile
- turn on document expiry to give clients a deadline
- turn on document reminders so clients get automatic email follow ups if they forget to sign
- personalize the featured photo
- save your contract as a template
You can preview your contract before sending it over. Once ready click Send Contract, then personalize the email message, and schedule it so it’s delivered at a convenient time for your client. If you’d rather share the contract manually, click Send via link. You’ll get notified once the contract is signed.
Learn how to create contracts in Pixieset. Also check out our article on 12 essential things to include in your photography contract.
Step 4: Set up a booking calendar in your client management app
1. Create a session type
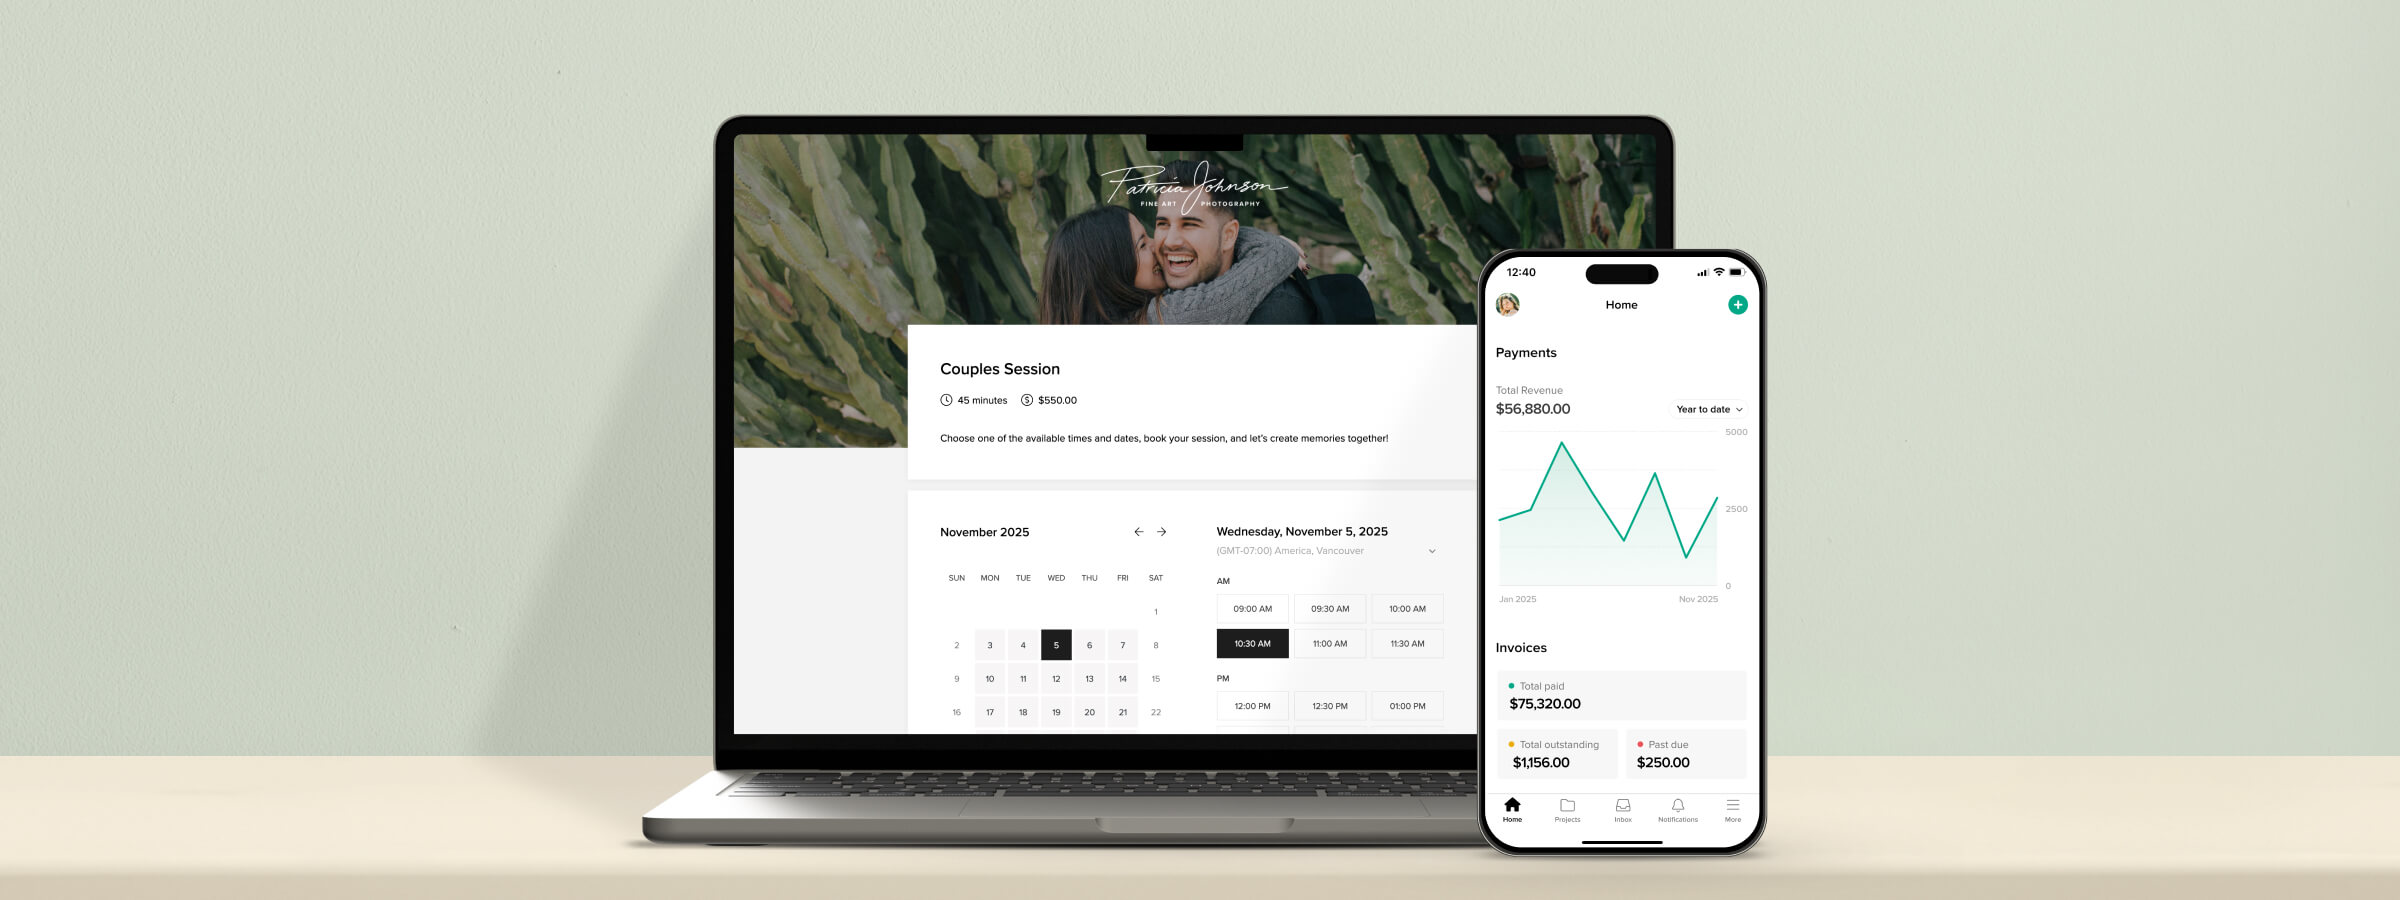
With Pixieset Studio Manager you can create an online calendar where clients book a session directly, eliminating the need for any back-and-forth messages. You set up your calendar and availability once, then Studio Manager does the scheduling for you. You can request for clients to pay the full or partial session fee, sign a contract and fill out a quick questionnaire, as part of the booking flow. Once they book, a confirmation email is sent with all the session details.
Here’s an example of a booking site created with Pixieset. To create your own site, start with a session type. Go to Bookings > Session Types > New Session Type and follow the steps.
When creating a session type for your booking site, you can:
- create a booking schedule for a full session or mini sessions
- add the duration, location, description, and price for the session
- set up your session availability, block off time, allow requests outside your availability
- set up payment/deposit collection methods
- add intake documents, such as a contract and questionnaire, to the booking flow
- set limits for how far in advance or how close to the session date clients can book you
- customize the “Thank-you for booking” message
- turn on automatic session reminders for clients
- turn on manual session approvals
- book phone calls or video calls by integrating Zoom and/or Google Meet
Preview your booking page before publishing to make sure everything works as intended. Once ready, click Publish so your booking page is ready to be shared. Now, go ahead and manually add a client session to your calendar to test how it works.
Helpful resources:
- How to create a session type for a booking site
- How to create a mini sessions schedule
- How to include a questionnaire or contract into the booking flow
- 5 reasons why every photographer needs to use an online booking site
2. Sync Google calendar with Studio Manager
By syncing your Google calendar with Studio Manager you can get a more centralized and unified view of your entire schedule. When a session is booked — it’s instantly synced to your Google calendar, with more information about the client and a quick link to details. Your personal appointments also get synced into Studio Manager, ensuring that all busy time slots are automatically blocked off and you don’t get double booked.
To sync your calendar go to Bookings > Calendar > Calendar Sync > Connect Google Calendar, and follow the steps.
Learn how to sync Google calendar to Pixieset Studio Manager.
Step 5: Chat with clients through Pixieset Studio Manager
1. Send your first email
Pixieset Studio Manager allows you to centralize all your client communication in one place. Reply to inquiries, send prep checklists to new clients, confirm contract details, and more. Go to Inbox > New Message to send your first email through Studio Manager. Format the message by highlighting words or paragraphs, add hyperlinks, attach files, or insert a pre-saved email template.
2. Create email templates
Instead of typing the same emails over and over, consider creating templates for various scenarios. For example, a reply template for initial inquiries; a thank-you note with session instructions or an outfit guide; a message when sending a contract or invoice; a note post-session to set expectations, etc.
To create your first email template, click on Insert email template > Manage templates right inside Inbox, or go to Templates > Emails > New template > Email and start typing it. Once done, save your template, then go to Inbox, start a new email, and insert the template you’ve just created.
Helpful resources:
- How to create email templates in Studio Manager
- 13 email templates to use in your photography business

Step 6: Streamline your workflow
1. Create your projects board
Now that you have your essentials set up, it’s time to make sure everything runs smoothly once things get busy. A projects board can help you keep track of all your client work, organize session details and documents, and stay on top of next steps and deliverables.
To create a projects board in Studio Manager:
- Go to Projects, click on “…” next to any column and try to edit, add, or remove a stage. Your projects board can be simple and include 4 stages: Inquiry → Booked session → Post-production → Completed project. Or you can build a more intricate workflow to track when clients accept a quote, pay a deposit, select favorite photos, etc.
- Click on Project Settings to customize your list of project types. These represent the different kinds of photography work you do, which you can later filter through and display on the board.
- Add a project by clicking on New Project at the top, or from inside any column.
- Create a document, session, or start an email conversations with the client right from inside the project card.
- Link an existing document or session to your project by following these steps.
Learn more about organizing your workflow with projects in Pixieset Studio Manager.
2. Create document templates
If you haven’t tried creating a template for an invoice or a contract in Step 3, you’re highly encouraged to do it now. Document templates are amazing for several reasons: they help you save time instead of creating new documents from scratch every time, they ensure consistency, and help you avoid errors and oversights.
In Studio Manager, you can create your own templates for contracts, invoices, questionnaires, quotes, and emails, to easily insert and reuse them in the future.
To create a new template, go to Templates, click New Template at the top, and pick one of the options. For contracts and questionnaires you’ll notice there are built-in free samples created by our team, to help you start quickly. Use them as a foundation to build out your own templates.
Helpful resources:
- 6 must-have things to include in your invoice
- 12 essential things to include in your photography contract
- 40+ question ideas to include in your photography questionnaire
- 6 tips for effective photography price quotes
- How to improve your photography workflow with document templates
3. Create a lead generation form
Last but not least, set up a form to capture leads automatically. You can embed it on your website, or add it as a link to your social media bio, so potential clients fill it out and get added to your contact list for further communication.
To create a form in Studio Manager go to Contacts > Contact Forms > New Contact Form and follow the steps. You can add or remove fields, and customize the form per your needs. You can choose if new contacts are labeled as leads, clients, or other. Once your form is ready, copy the embed code to add it to your website, or share it via a direct link.
Learn how to create lead generation forms in Pixieset Studio Manager.
Step 7: Download the Studio Manager mobile app
Be sure to install the Studio Manager mobile app to easily access and manage your sessions, projects, documents, payments, client emails — from anywhere. The beauty of the app is that it also lets you collect in-person payments. Your clients simply need to tap their card, phone, or smartwatch to pay. It’s perfect if you photograph mini sessions, need to collect a deposit/retainer during the first client meeting, or want to skip payments in cash and checks. Learn more about using Tap to Pay in the Studio Manager mobile app.
The Studio Manager mobile app is available via the App Store and Google Play. Install it, log into your Pixieset account, and enjoy having access to everything, on the go.

Now you’re all set up with your Pixieset Studio Manager and can enjoy a more organized and streamlined way to run your photography business. For more information and tutorials on Studio Manager, check out our knowledge base here, or reach out to our support team via the chat bubble inside your dashboard.
FAQs
- How does Pixieset Studio Manager compare to other client management apps?
While there are multiple software options available on the market, Pixieset Studio Manager directly integrates with your photo galleries and website, helping you build a more centralized, and streamlined workflow. You can book clients, present your brand online, share your work with clients, get paid — all through one tool. The design and dashboard are super intuitive, helping photographers manage their business is a more clear and organized way. - Can I use Pixieset Studio Manager for free?
Pixieset Studio Manager is available via a free plan, allowing you to sign up and try everything before committing to a paid subscription. You can stay on the free plan for as long as you need, and unlock more features as your business grows. - How do I switch to Pixieset Studio Manager from a different client management app?Follow the steps from the article above, as well as tutorials from our knowledge base to ensure a smooth and easy switch to Pixieset Studio Manager. Also, you can contact our support team if you have questions or need more guidance.
- Can I access my Pixieset Studio Manager on mobile? Absolutely! Pixieset Studio Manager is available on desktop and as a mobile app too. Manage your bookings, review session details, create and send documents to clients, or take in-person payments right on your phone, with the Studio Manager mobile app. You can download it for free from the App Store and Google Play.

 Studio Manager
 Client Gallery